
One of the most popular and efficient ways to focus attention, underline the keys, and increase interest in your videos is animated text. Intending to put forward a brand, accentuate the main message, or create captions for the tutorial, with CapCut Desktop Video Editor, text animations allow your presentation to feel more personal and professional.
CapCut has a large selection of text animation presets, including type animation effects, zoom, fading, and other dynamic movements, which are simple to apply and may be used effortlessly with just about any style of writing. One does not have to be a professional in the design field or an animator in order to make eye-catching images; several clicks will make the video more stylistically and tonally supplied. To drive a point clearly yet with cosmic flair, these animations will go along with anything that has an AI voice generator or good sound quality.
This tutorial will demonstrate how to add and customize the text animations in CapCut Desktop properly with the help of the appropriate interface steps.
The Importance of Text Animations
Text animations are not the plain motion of text blocks, but rather control the attention of the viewer, remind them about messaging, and help to remember the information faster. Catchy titles may help to heat up the start of sections, highlight names or figures, or make social media reels and shorts more fun and energetic. Even the smallest text animation can add a lot to your content that feels stagnant or otherwise deprived of personality.
With the help of the clear interface offered by CapCut Desktop Video Editor, making experiments is incredibly easy, which does not burden the working process. They are more immersive, especially when used in combination with animations to provide overlays, background effects, or synced speech.
Step By Step – How To Add And Customize Text Animations In CapCut
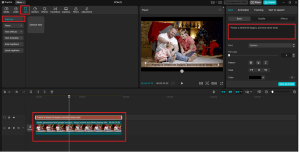
Step 1: Open CapCut and Add a Text Layer to Your Timeline
First of all, open CapCut Desktop and create a “New project”. The video you want to import will have to be dragged over the “Media” panel and then onto the timeline. When the footage fits, go to the top menu and choose the “Text” tab. Get the “Add text” and print your preferred text, title, or subtitle on the text box floating in the preview window. The layer of text will also be displayed on the timeline, and it can be moved or cut like any video or audio information.
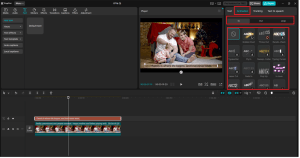
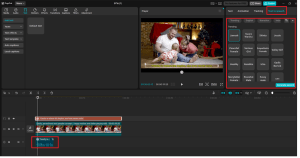
Step 2: Apply Text Animation from the Animation Panel
Having your text layer selected, locate the “Animation” tab at the upper part of the screen by clicking on it. The effects will be three types: “In”, “Out”, and “Loop”. In animation governs the flow of the text on the screen, and the out animation governs the text out. Loop brings consistency in the movement of the text on the screen. Select the type of animation you desire and click on style-such as typewriter, pop-up, slide, and zoom. After selection, you will notice a thin animation bar located alongside your text clip on the timeline.
When you drag the ends of this animation bar, you can change the length of time the animation plays. This is to synchronise the pace and meter of movement in your video. And when you are going to present some text on top of short-heavy scenes, it is simply necessary to increase the video quality using an AI video upscaler so that your animations will not be hard to read.
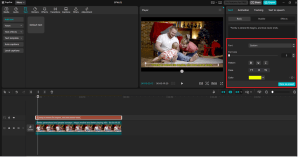
Step 3: Customize Fonts, Styles, and Effects for Better Visual Appeal
But CapCut will not only provide you with the commonly used motion effects, but also leave font customization in your hands and allow you to go crazy with it. Having your text layer still highlighted, go to the “Text” panel on the right. In this case, it is possible to alter font, colour, size and outline, shadow, and you can even paint background fill to fit in your video theme.
You may also visit the “Text effects” tab to add more animated effects to your text, i.e,. glowing outline effects, flicking strokes, or sparking effects. They can be combined with your selection of entry and exit animations to add some explosive effect. Even imported fonts are supported in CapCut in case you are working on a branded video or require something unique than what is available in-built.
Step 4: Sync Text Animation with Audio and Voiceovers
The animations of text are even more startling when it is synchronized with the audio or voice-over in your video. In case you are using the CapCut “Text to speech” option, you can quickly create a professional narration out of any script without recording.
To achieve the same, take on the button “Text” and “Add text”, which is typed using a script. On the right panel, scroll down to the “Text to speech” part, choose your desired language, voice, and tones, and click “Generate speech”. CapCut will generate a realistic-sounding narration and will take it to your timeline as an audio recording. Take advantage of the waveform and align your animated text with the spoken words. This text to speech AI technology can be used to make explainer videos, tutorials, and product demos look polished and feel professional.
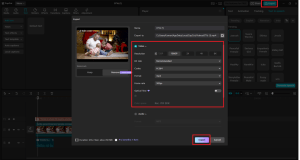
Step 5: Preview, Adjust, and Export
Once you have applied your animations and matched them with sound, you can press the Play button to have a preview of everything. Pay attention to the time, reading, and visuality. Implement any required adjustments on the animation speed, font size, or available duration of the texts. When it all seems to be right, go to the top right-hand corner and press the “Export” button. Select your export resolution, format, and filename, then export yet again to save your animated video.
Final Thoughts
One of the easiest things you can do to add text animation to your video and make it both interesting and professional is to add text animation and customize it in CapCut Desktop. From the introduction of a section to the naming of a product and matching up with a voiceover, creating a caption, animated text seems to fit in the style department and the clarity technique. And with the combined use of tools such as an AI voice generator, an AI video upscaler, and text-to-speech AI, your overall editing process acquires a new boost because it is now quicker, more efficient, and influential.